Battery switch on travel trailer function is crucial for managing your RV’s power. Understanding how these switches work—whether single, dual, or using isolators—is key to preventing dead batteries and ensuring a smooth camping experience. This guide breaks down the different types, their purposes, troubleshooting tips, and safety precautions to keep your RV’s electrical system running smoothly.
We’ll explore how the battery switch directs power between your house batteries and your vehicle’s starting battery, preventing unwanted drain on one or the other. We’ll also cover important safety considerations when working with 12V systems and offer guidance on upgrading or replacing your battery switch if needed. Get ready to become a travel trailer electrical system pro!
Battery Switch Types in Travel Trailers
Choosing the right battery switch for your travel trailer is crucial for managing your power sources efficiently and safely. Understanding the different types available will help you make an informed decision based on your specific needs and budget. This section details the common types of battery switches and their respective pros and cons.
Single Battery Switches
A single battery switch is the simplest type, designed to connect or disconnect a single battery from the trailer’s electrical system. It’s typically a simple on/off switch, providing a basic means of controlling power to the trailer’s 12-volt system. This is a cost-effective solution for trailers with only one battery.
Dual Battery Switches
Dual battery switches allow you to manage two batteries independently. This is common in travel trailers with a house battery (for appliances) and a starting battery (for the vehicle’s engine). These switches often have three positions: “Both,” “Battery 1,” and “Battery 2,” allowing you to use both batteries simultaneously, or isolate one for charging or maintenance. The ability to isolate the batteries is critical to prevent draining your starting battery while parked.
Battery Isolators
Unlike switches that manually disconnect batteries, a battery isolator automatically manages the charging and power distribution between multiple batteries. They use diodes or relays to ensure that the alternator charges both batteries while driving, preventing one from draining the other. However, they are less efficient than a dual battery switch when it comes to charging speeds.
Comparison of Battery Switch Types
| Feature | Single Battery Switch | Dual Battery Switch | Battery Isolator |
|---|---|---|---|
| Number of Batteries Managed | One | Two | Two or More |
| Control Type | Manual On/Off | Manual Switching Between Batteries | Automatic |
| Charging Efficiency | N/A | High (when both batteries are connected) | Moderate (some voltage drop) |
| Cost | Low | Medium | Medium to High |
| Maintenance | Low | Low | Low (periodic inspection) |
| Typical Application | Small trailers with single battery | Trailers with separate house and starting batteries | Trailers needing automatic battery charging and management |
Function and Purpose of the Battery Switch: Battery Switch On Travel Trailer Function
The battery switch in your travel trailer is a crucial component of its electrical system, acting as the central control for power distribution and protection. It allows you to selectively connect and disconnect your house batteries from the rest of the trailer’s electrical system, as well as manage the interaction between your house batteries and your tow vehicle’s starting battery.
So, you’re prepping for your next adventure in your travel trailer? First things first: make sure you understand the battery switch on travel trailer function – it’s crucial for keeping your lights and appliances running. Once that’s sorted, let’s talk sound! For the audiophile on the go, setting up a killer soundsystem is key. Check out this guide on audiophile travel aetup to transform your RV into a mobile concert hall.
Seriously, good tunes make any trip better.
Understanding its function is key to preventing battery drain and ensuring the longevity of your trailer’s power supply.The primary function of the battery switch is to manage the flow of power between the house battery (or batteries) and the rest of the trailer’s 12-volt system. This system includes things like lights, water pumps, refrigerators, and other appliances. It also controls the connection (or disconnection) between the house batteries and the vehicle’s starting battery (often for charging the house batteries while driving).
A properly functioning switch prevents accidental drain on your house batteries when the trailer is not in use and protects your vehicle’s starting battery from being drained by the trailer’s systems.
Power Flow Management Between Batteries
The battery switch acts as a gatekeeper, controlling the path of electrical current. In the “off” position, it completely isolates the house battery from the rest of the trailer’s electrical system, preventing any drain. In the “on” position, it connects the house battery to the trailer’s 12-volt system, allowing power to flow to the various appliances. Many switches also offer a “start” position which connects the house battery to the vehicle’s charging system, allowing the vehicle’s alternator to recharge the house batteries while driving.
This prevents the need to use a separate charging system when traveling.
So, you’re prepping for your next adventure in your travel trailer? First things first: understand your power! Check out this guide on the battery switch on travel trailer function to avoid any dead-battery surprises. Once you’ve got the power sorted, it’s time to think about entertainment. For the audiophile on the go, setting up a killer soundscape is key.
This link will help: audiophile travel aetup. With those two things covered, you’re well on your way to a smooth and enjoyable trip!
Preventing Battery Drain and Ensuring Optimal Power Distribution
Leaving your house batteries connected to the trailer’s electrical system while it’s not in use can lead to significant battery drain over time, even from small parasitic loads like LED lights that remain on. The battery switch prevents this by allowing you to completely disconnect the house batteries when the trailer is stored. This ensures that your batteries are ready to power your appliances when you’re next camping.
The switch also prevents a situation where a faulty appliance could drain your vehicle’s starting battery if a direct connection exists. By selectively controlling power flow, the switch maximizes battery life and prevents unexpected power outages.
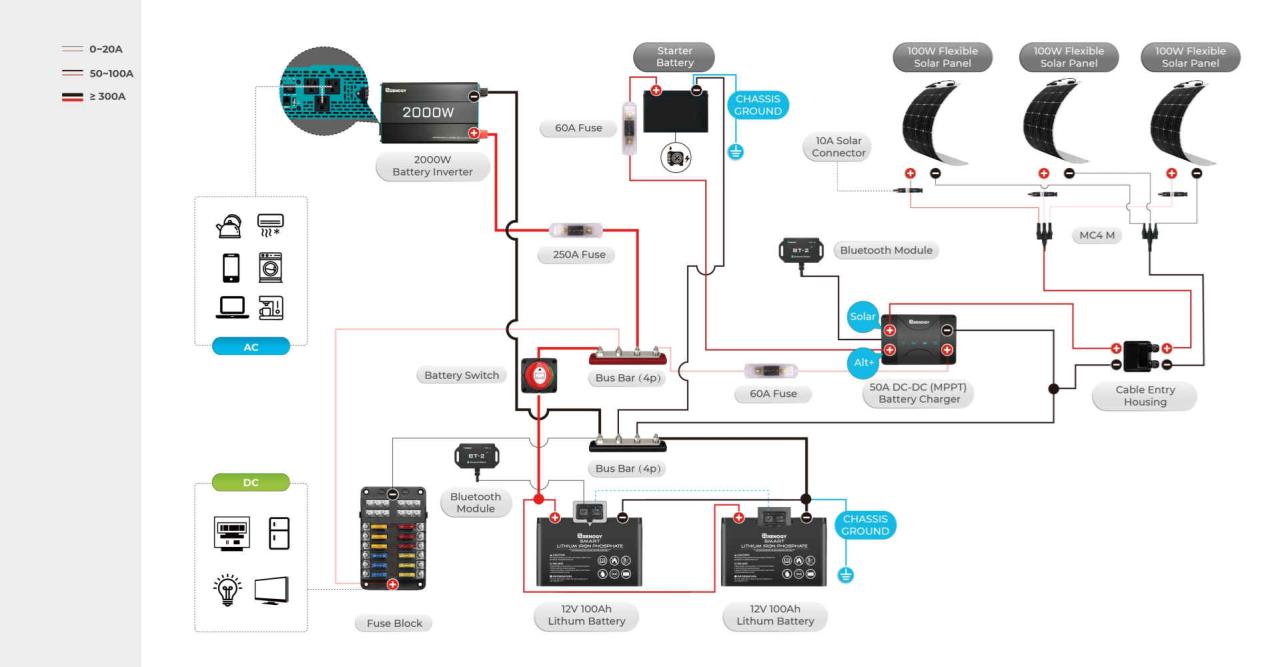
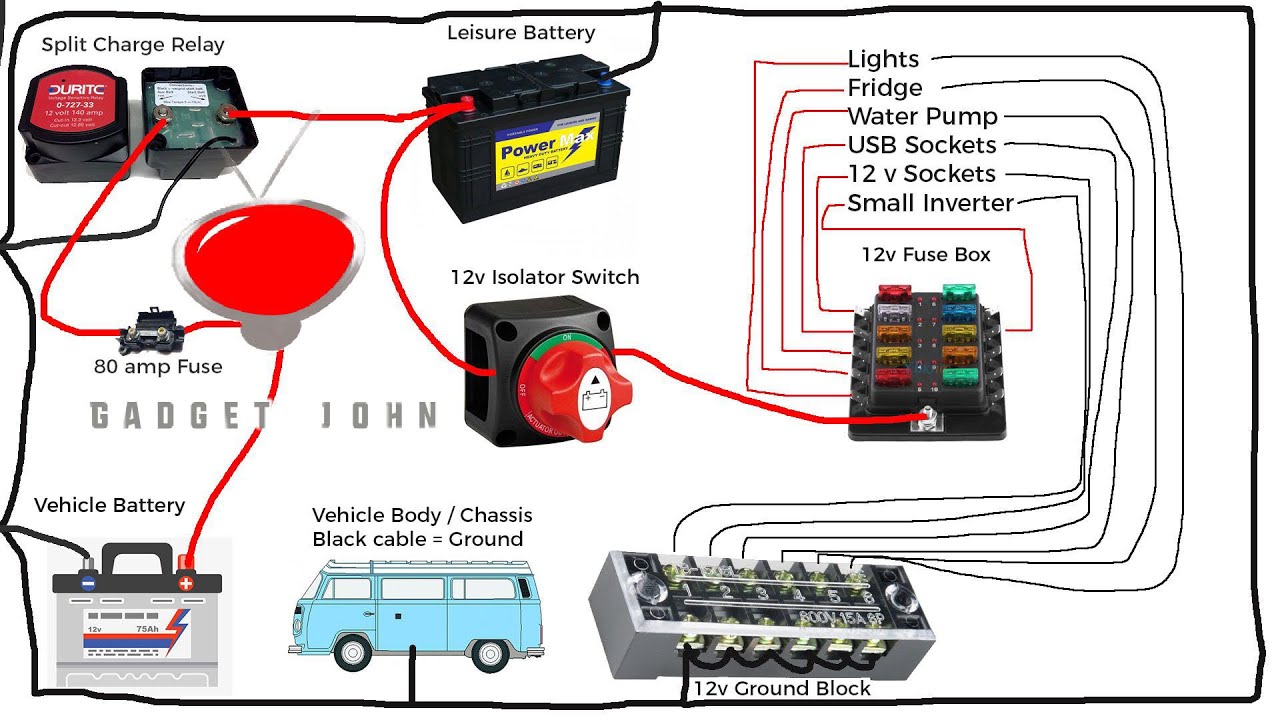
Diagram of a Typical Travel Trailer Electrical System with a Battery Switch
Imagine a simple diagram: We have three main components: the vehicle’s starting battery (labeled “Vehicle Battery”), the travel trailer’s house battery (labeled “House Battery”), and the trailer’s 12-volt electrical system (represented by a box labeled “Trailer Appliances”). A three-position battery switch is placed between the house battery and the rest of the system. The switch has three positions: “Off” (represented by an open circuit symbol between the house battery and the trailer appliances), “On” (represented by a closed circuit symbol, showing a direct connection between the house battery and the trailer appliances), and “Start” (represented by a closed circuit symbol connecting the house battery to the vehicle battery via a charging circuit, usually incorporating a diode or other charge-regulating component).
Arrows indicate the direction of power flow in each position. In the “Start” position, the arrow would indicate power flowing from the vehicle battery to the house battery. In the “On” position, the arrow indicates power flowing from the house battery to the trailer appliances. This visual representation clearly shows how the switch controls the flow of electricity and protects both battery banks.
Safety Precautions and Best Practices
Working with your travel trailer’s electrical system, especially the battery switch, requires caution. Improper handling can lead to serious injury from electric shock, battery acid burns, or even fire. Understanding the inherent risks and following established safety procedures is crucial for a safe and enjoyable RV experience.Proper maintenance of your battery switch is essential for its longevity and reliable operation.
Neglecting maintenance can lead to premature failure, potentially stranding you and causing significant inconvenience. Regular checks and simple cleaning can prevent costly repairs or replacements down the line.
Battery Switch Safety Precautions
Working with any electrical system involves potential hazards. Always disconnect the negative (-) battery terminal before working on any component of the 12V system. This is the safest practice, minimizing the risk of accidental shorts or shocks. Remember to wear appropriate safety gear like gloves and eye protection to further reduce the risk of injury. If you’re uncomfortable working with electrical systems, consult a qualified RV technician.
Battery Switch Maintenance Best Practices, Battery switch on travel trailer function
Regular inspection of the battery switch is key to preventing problems. Visually check the switch for any signs of corrosion, loose connections, or damage. Clean any corrosion with a wire brush and baking soda solution, ensuring all connections are tight and secure. Lubricate the switch mechanism according to the manufacturer’s instructions to ensure smooth operation. This preventative maintenance will significantly extend the life of your battery switch.
Hazards of Incorrect Operation and Neglect
Incorrect operation of the battery switch can lead to a variety of issues. For example, accidentally leaving the switch in the “on” position while the trailer is not in use can drain your batteries, leaving you without power when you need it. Conversely, leaving it off when you need power renders your appliances inoperable. Neglecting maintenance can lead to corrosion, creating a fire hazard or causing the switch to fail completely.
A failed battery switch might result in a complete loss of power, stranding you and requiring potentially expensive repairs. In extreme cases, corrosion can lead to short circuits and fire, posing a significant safety risk.
Essential Safety Tips for Working with 12V Systems
- Always disconnect the negative (-) battery terminal before performing any work on the 12V system.
- Wear appropriate safety glasses and gloves to protect against acid splashes and electrical shocks.
- Ensure adequate ventilation when working near batteries to avoid inhaling potentially harmful gases.
- Never touch the terminals of a battery while the switch is on.
- Use insulated tools to avoid accidental shorts or shocks.
- If you are unsure about any procedure, consult a qualified RV technician.
- Keep a fire extinguisher nearby when working with electrical systems.
- Inspect all connections for corrosion regularly and clean as needed.
Upgrading or Replacing a Battery Switch
Upgrading or replacing your travel trailer’s battery switch is a worthwhile project if your current switch is failing, inadequate for your power needs, or you simply want improved functionality and safety. Several factors influence the decision-making process, from the amperage rating to the type of switch and its features. Choosing the right replacement is key to ensuring reliable power management and protecting your investment.Choosing a new battery switch involves considering several key factors.
The most important is the amperage rating, which must be equal to or greater than the total amperage draw of all your appliances and devices. Next, think about the type of switch; a simple on/off switch is sufficient for basic needs, but a more sophisticated switch with multiple banks (allowing separate control of different battery banks) might be preferable for larger setups or those with solar panels.
Finally, consider the build quality and durability of the switch – you want something robust enough to withstand the rigors of travel and the elements.
Factors to Consider When Upgrading or Replacing a Travel Trailer Battery Switch
Amperage rating is paramount. It determines the maximum current the switch can handle safely. Underestimating this can lead to overheating and potential fire hazards. Consider your current power demands and future expansion plans. A higher amperage rating provides headroom for additional appliances.
Durability is also critical. Look for switches made from high-quality materials, like heavy-duty plastic or metal, designed to resist corrosion and vibration. Features such as clearly marked terminals, a positive indication of the switch position, and easy-to-use controls add convenience and safety. Finally, the switch’s mounting style should be compatible with your existing setup.
Comparing Different Brands and Models of Battery Switches
The market offers various brands and models of battery switches. Some popular brands include Blue Sea Systems, Perko, and Sterling Power. Blue Sea Systems, for example, is known for its robust and reliable switches, often found in higher-end RVs. Perko offers a range of options at different price points, balancing quality and affordability. Sterling Power focuses on sophisticated battery management systems, often including multiple-bank switches with advanced features.
Each brand offers different amperage ratings, numbers of banks, and features. Consider your needs and budget when selecting a specific model. For example, a basic two-bank switch from Perko might suffice for a smaller trailer, while a high-amperage, multi-bank switch from Blue Sea Systems might be better suited for a larger rig with extensive power demands.
Steps Involved in Safely Removing and Installing a New Battery Switch
Before starting any work, always disconnect the negative battery terminal. This prevents accidental shorts and protects you from electrical shock. Then, carefully remove the old switch, noting the wiring configuration before disconnecting any wires. Take pictures or make a detailed diagram. This will help during the reinstallation.
Clean the mounting surface thoroughly. Mount the new switch securely, ensuring a tight and stable connection. Now, connect the wires to the new switch, following your diagram or pictures meticulously. Double-check each connection to ensure accuracy and prevent errors. Reconnect the negative battery terminal only after all connections are verified.
Finally, test the new switch to ensure all functions work correctly.
Proper Wiring Connections for a New Battery Switch Installation
Proper wiring is crucial for safety and functionality. Use appropriately sized wiring; undersized wire can overheat and pose a fire risk. The wire gauge should be sufficient to handle the maximum amperage of the switch and the connected circuits. Consult a wire gauge chart to determine the correct size. Connect the positive (+) battery cable to the battery’s positive terminal and then to the “in” terminal of the battery switch.
Connect the positive output terminal of the switch to the positive bus bar or distribution panel. Connect the negative (-) battery cable to the battery’s negative terminal and then to the chassis ground. Do not connect the negative cable to the switch. Use appropriately sized ring terminals for secure connections to the battery and switch terminals.
Always use high-quality marine-grade wire for maximum durability and resistance to corrosion. For example, using 8-gauge wire for a 100-amp switch is appropriate, while a 150-amp switch may require 6-gauge wire. Always check your switch’s specifications for the recommended wire gauge.
Mastering your travel trailer’s battery switch is all about understanding its function and taking preventative measures. By familiarizing yourself with the different types of switches, troubleshooting common issues, and prioritizing safety, you’ll ensure reliable power for all your adventures. Remember regular inspection and maintenance are your best allies in preventing problems and extending the life of your battery switch. Happy travels!
Common Queries
What size fuse should I use with my battery switch?
The correct fuse size depends on the amperage rating of your battery switch and wiring. Consult your switch’s documentation or a qualified electrician for the appropriate size.
My battery switch is making clicking noises. What’s wrong?
Clicking often indicates a faulty switch, loose connections, or a low battery. Check all connections and consider testing the switch with a multimeter or replacing it.
Can I leave my battery switch on all the time?
While generally safe, leaving the switch constantly on can potentially drain your batteries if there’s a parasitic drain somewhere in your RV’s electrical system. It’s best practice to turn it off when not in use for extended periods.
How often should I inspect my battery switch?
Regular inspection, at least seasonally or before each trip, is recommended. Look for corrosion, loose connections, or any signs of damage.
